
Trio Of Dead Flowers Scannergram
I love when people give me flowers although I love waiting for them to die so I can scan them more 🙂
 CanoScan 9000F Scanner.
Autumn
Autumn is upon us…
A leaf on my flat bed scanner, with a box over it for a black background. I love how it feels like its just floating there 🙂
Enjoy
 CanoScan 9000F Scanner.
Butterfly
A couple of macro shots using extension tubes and a 50mm lens…

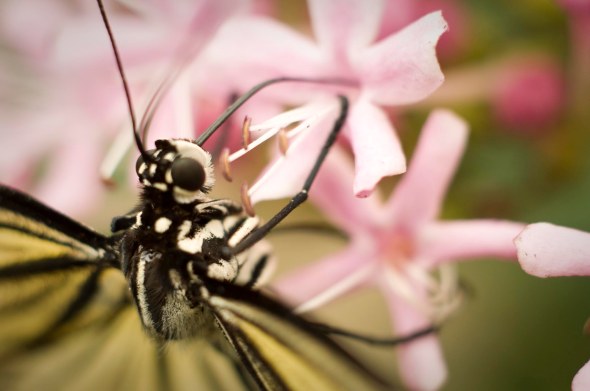 Nikon D90, 50mm f1.8, Nikon PK-12 and PK-13 Extension Tubes.
More Tulips
I spent some time making timelapses at the gardens a few weeks ago… This was me filling in time while I waited 🙂
 Rolleiflex 2.8 E, Rolleinar 1, Ilford HP5+ 400 ISO Film, CanoScan 9000F Scanner.
More Scanner Macro

A couple of more tests using my CanoScan 9000F Scanner as a macro camera… The first using a black box and the bottom scanning head only and the second one I mounted a petal to a 35mm slide mount and used the top scanning head which gives much higher resolution.

 CanoScan 9000F Scanner.
Leaf Scan
Still shooting my way through the first roll of film since Rollei’s come back from repair. I was working at Photo Warehouse the other day and talked to a guy on the phone who wanted a scanner to use as a macro. This got me to thinking that I could use my CanoScan 9000F to shine light through stuff, like leaves… Anyway here goes my first attempt with a partially decomposed leaf I found on the steps up to my house 🙂
 CanoScan 9000F Scanner.
Dead Flower
An old one playing with extension tubes…
Finished developing and scanning film last night so we should be back to new stuff soon… Promise 🙂
 Nikon F5, 50mm f1.8 Lens, PK-12 Extension Tube.
Mantis
 Nikon F5, 50mm f1.8 Lens, PK-12 Extension Tube, Ilford HP5+ 400 ISO Film, CanoScan 9000F Scanner.
A Couple Of Angels
I haven’t posted any images of cemeteries for a while, having been concentrating more on street photography, so here goes a couple of shots from two different walks.
I really like the Bokeh in the first image…
The second image is from a roll I took with an extension tube and a 50mm lens with the purpose of getting images of textures and things that would be good to use with blending layers etc… Since I took it I haven’t had much motivation to sit in front of my computer much so maybe I will get round to it one day…

 Top Image: Rolleiflex 2.8 E, Ilford HP5+ 400 ISO Film, CanoScan 9000F Scanner.
Bottom Image: Nikon F5, 50mm f1.8 and PK-12 Extension Tube, HP5+ 400 ISO Film, CanoScan 9000F Scanner.
Just Uploaded 3 Photo5 Competition Entries
finally got round to uploading some of my Canon Photo5 Entries.
 Single drop of water with a picture of a cityscape inside it hanging from the head of a pin.
 Bubblegum Portrait
 Incense Black and White
Still have to do:
Confetti Motion
Inspired by sound
Only about a week to go so will have to crank it up to get the last two done… Wish me luck
How It Was Done: Water Drop Shot
Ok so I havent done one of these in a while and the entry’s for the Photo5 competition have closed so theoretically no one can copy this for the competition.
Anyway here is the finished image that I submitted to the competition….

Competition Brief: Eye Dropper
This brief is asking you to use your lens to look closer. Use the eye dropper to place drops of liquid in any arrangement you want. You can use a single drop, or as many drops as you like.
And you’re not limited to just water – feel free to use liquids of different colours and consistencies, such as milk or tomato soup. Just make sure you get close.
OK that seems simple enough…
I had the idea to suspend a drop of water from the head of a pin and using a slide projector somehow get an image into the drop (at this point I want to say that using Photoshop wasnt an option that I really wanted to use).
Equipment Used: Kinderman Slide Projector, Nikon D70s with 50mm f1.8, 2 x Nikon PK13 and 1 x PK12 Extension Tubes, Tripod, Cullman Macro Rail, Various supports like chairs, 1 x Pin, Bluetac and a 42″ translucent reflector (used later on)… Oh and various slides.
So I set up the projector at the same height as the camera and blasted a slide onto the drop of water (which took at least 15 minutes to get to stay on the head of the pin) which produced the following image.
Even at 1/5000th of a second this was about as good as it got… Not really the look I was going for…
Step 2: Place a 42″ reflector in front of the projector to act as a screen… At the moment the projector is about 1.5 metres away from the water droplet.
 Ok at this point I stop thinking “what the heck am I doing this is never going to work I must be crazy”! And start seeing a small glimmer of hope projected down a very bright slide projector.
However still not really what I had in mind when I initially set out.
Step 3: Time to move everything back away from the projector… now about 3 metres away still with the reflector in front acting as a screen.
I keep forgetting stuff… The slide was projected onto the screen upside down so that it was right side up in the droplet.
 OK now we are cooking but still not quite right.
This is what the setup currently looks like (the images are from a point and shoot so sorry about quality/focus issues)
 My studio is soooo sophisticated 🙂
 Who needs a macro lens when you have a bazillion extension tubes…
Opps almost forgot to say that I added a small pop of speedlight at the pin just to give it a bit of a catch light.
Anyway I found that by moving a reflector backwards and forwards I could alter how much of the image would appear in the drop so after a lot of stuffing round (293 images from the first shot) this is the image that I liked the best…
 This is the file straight off the camera with no processing
With a bit of straightening and a saturation boost and not to mention all the dust removal here we go 🙂
And before I forget here is a scan of the slide that I used…

All droplet shots on Nikon D70s with 50mm f1.8 Lens with 2 x Nikon PK13 + 1 PK12 Extension Tubes.
Not as Dead Flower
Not as dead as the last one
 Nikon F5, 50mm f1.8 Lens, PK13 Extension Tube, Ilford HP5+ 400 ISO Film


Recent Comments